Page 3 of 5: Using TMPGEnc DVD Author (TDA) - How to Create/Author a DVD
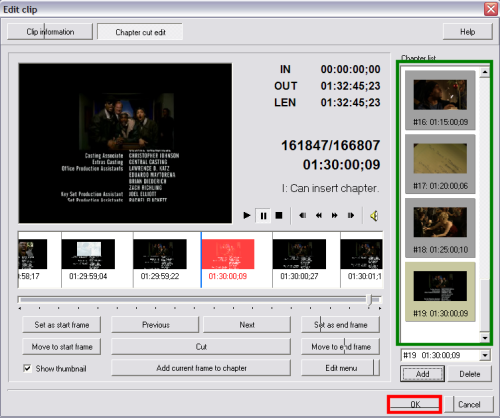
After TDA finishes adding the chapters for you (green), click the "OK" button (red) and then it will return back to the main TDA screen. Here you need to click the "Create menu" button at the top (blue).

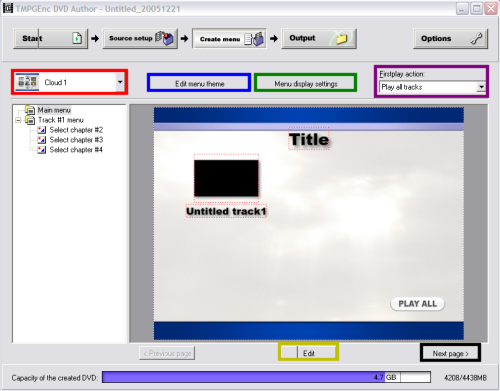
After clicking the "Create menu" button at the top, this screen will come up allowing you to fully customize the way the menu looks and functions. There is really far to much to explain here at this section so I recommend you just play around with it until you get the hang of what button does what, etc. I will give you a few quick tips on where to change stuff.
Note: You will have to modify each page of the menu, if you have alot of chapters, you will have several pages of menu. Editing them by clicking the "Next" button (black)
(Screen Shot Below)
After clicking the "Create menu" button at the top, this screen will come up allowing you to fully customize the way the menu looks and functions. There is really far to much to explain here at this section so I recommend you just play around with it until you get the hang of what button does what, etc. I will give you a few quick tips on where to change stuff.
- Menu Theme (red) - Change the colors and visual appearance of the Menu, change the menu layout and where the buttons are located, layout of the track menu, allows you to pick a different set of buttons, background image, and more.
- Edit menu theme (blue) - Create a customized menu or edit your current customized menu
- Menu display settings (green) - What items you want the menu to have, what you want the first action of the menu to do, what you want the DVD to do after each track is played, number of chapter displayed on the menu screen, what colors you want for "Selected" items and what color you want for "Activated" items.
- Firstplay action (purple) - Which item you want to play first or automatically play all tracks
- Edit button (gold) - Allows you to specify a different background image or set a image for all the pages in the menu, set the font for all pages, set the font color for all pages, create new theme for the Main menu
Note: You will have to modify each page of the menu, if you have alot of chapters, you will have several pages of menu. Editing them by clicking the "Next" button (black)
(Screen Shot Below)
