

Page 1 of 1: DVD Backup using Nero Recode
Ahead Software in
www.nero.com or www.nero.de
for the remainder of January 2004.
Nero is a product that is frequently bundled with CD-R burners and now with DVD burners. The bundled versions may
lack some features and may not be upgradable to the current version (6.300) on the Nero Web site. Since Nero is so freely available with burners and on discount Websites and EBAY, it may be worth your time to download the entire package including upgrades now. If , in the future, you locate an inexpensive 6.3 version, you will have the upgrades already.( The NeroVision upgrade is nve2104.exe)
The idea behind NeroVision and Recode is exactly that of programs like DVD2ONE and DVDShrink. Many current DVD's are of the DVD-9 variety (i.e. up to 9.4 Gigabytes) on double layer discs. Consumer DVD burners only support DVD-5 (4.7 Gigabyte on the DVD) blanks and there is little hope for consumer DVD-9 burners for the future. The two solutions are to 1) divide the disc into two DVD-5's or 2)"shrink" the DVD video content and therefore reduce its quality somewhat to fit into a smaller 4.7 GIG disc. You can also eliminate or reduce the size of non main movie content to retain as much space as possible for the main movie. If both widescreen and regular aspect ration movies are present, one can be eliminated. Some people backup
their collections into one disc with widescreen and another with 4:3 aspect ratio. Others use one disc for the main movie and another for everything else.
Since Ahead Software would have a great deal to lose from a copyright violation suit, they do not include decryption removal features. The software package is designed for those with nonencrypted titles on a DVD-9 or larger disc. Hmm, I have seen some European movies and X-rated films without encryption, but these are rare. So only a person with a professionally manufactured DVD-9 disc with permission to copy it can use this software. OK!
INSTALLATION
To begin with , download the Demoversion of Nero6.3 and the NeroVision upgrade from www.nero.com or www.nero.de
You must download Direct X 9 or higher from www.microsoft.com/directx
Install Direct X 9 and reboot. Now install the demo and then the upgrade (NeroVision) and reboot. During my installation of the Demoversion on three computers,
the installer was unable to remove the previous Nero Version 5.9 (command line error) and halted. I then removed the existing Nero software through Control
Panel and was able to install the Demoversion without a problem. Reboot again. The software is now at your disposal.
Now start the Nero Vision Express 2 and the nested icon for Nero Recode. Choose "Copy Entire DVD to DVD."Now choose DVD Video Files and Import the files from the hard drive. You must choose the VIDEO_TS folder and click OK. Recode will spend one to three minutes performing a brief analysis of the disk to determine file structure and amount of compression used. The small TV screen in the lower left corner can be resized as you preview titles and menus by clicking on them and pressing the tiny play button.
You may receive a message during playback about Dolby 5.1 not being available during preview. This will not affect the resultant DVD.
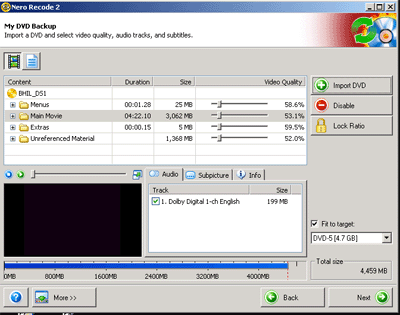
Figure
1
To the right you can choose whichever audio languages and subtitles you wish to retain in the recode. Now you can adjust or remove titles as you wish.
As you click on each title, you can determine its content and watch a little of it. If you decide that twenty previews are a waste of disk space, highlight the preview section and disable it (RED button). You must then browse your computer to locate a BMP file that will replace these items. Other replacements are possible but a BMP is readily available and quick.
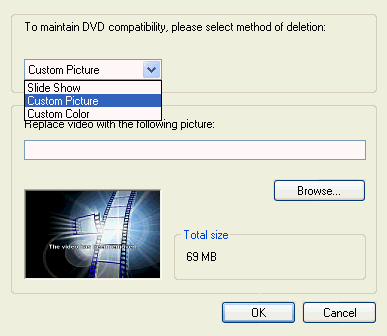
Figure 2
You can also adjust the compression sliders to greatly reduce the size of the previews, interviews or whatever. If you do not lock the compression ratios (big lock button) Nero will give a higher priority to the main movie. Note that compression ratio can only be specified for one title.
You also have the option of choosing your audio languages and subtitles. These generally take up little space on the disc but just make certain that Recode
has not eliminated the languages or subtitles you wish to retain. The info tab reveals relevant details about each title's attributes. In this case (Figure 1), the
interviews had a higher than normal average bit rate while the Main Movie had a more normal 6 Mps rate. The interview segment would therefore be
a target for heavier transcoding.
When you choose the NEXT button, you are taken to a screen where you can choose the location of the resultant files. A hard disk folder (4.7 GIG) or a DVD burner can be used or a Nero proprietary image file can be chosen for later mounting as an image disc. If the DVD burner is chosen, burning will begin immediately after deep analysis.
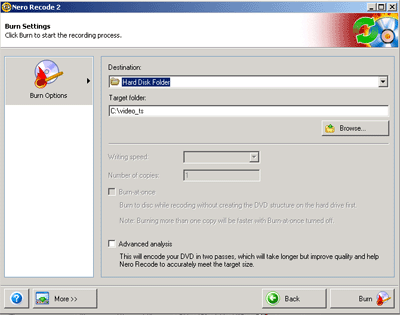
Figure 3
Then there is the Burn at Once option. If you choose this and burning fails for some reason, the shrunken or Recoded DVD files are gone.
Deep analysis determines the points where MPEG2 compression can be mathematically maximized by the program's algorithm-for instance, a dark scene. Bright scenes with a lot of action are just the opposite. Still, the total file size must be kept within the 4.7 GIG limit. The deep analysis can easily require an hour's time or more depending upon the computer system.
Is it worth the extra time? Considering the fact that an entire disk is being "squeezed," this process does produce the best quality. You can also use Recode to eliminate everything but the main movie. If you do this, no compression may be necessary, depending on the movie.
TWO MOVIE DISKS
Many DVD-9 discs contain both widescreen and normal 4:3 ratio versions of the same film. Sometimes two different movies are offered.
With Recode, you can preview each movie to determine which one to keep. For example, a widescreen movie should be fairly obvious on the small player screen.
The Disable button would substitute a bmp file and preserve the quality of the remaining normal ratio movie. After burning, you could do the opposite to backup both formats. The same is true for interviews and special features: eliminate the main movie from one disc to just have the menus and special features and leave the
Movie for the second disc with no loss in quality.
There is a way to further analyse the disk. In Windows Explorer (Win 2K and XP) choose Tools, Folder Options and uncheck Hide File Extensions for Known File Types . This options is under View, Folder Options in Win 9.x and ME. Now you can open the VIDEO_TS folder on you DVD to examine the file structure. The IFO suffix (i.e. VTS_01_0.IFO) defines each title or movie. For instance, if the structure has a group of VOB files numbered sequentially vts_01_1.vob, vts_01_2.vob, etc. with a preceeding VTS_01_0.IFO, that is one movie. If there is another of the same size with vts_02_1.vob, etc. that is the second movie.
Just right click on the IFO file and choose "open with" to locate DVDShrink 2.0 and up from the Windows dialogue box (i.e. to determine which application to use). In Windows 98 and ME, hold the shift key while right clicking to enable access to "open with."
Also, in DVD Shrink, you can search for the preview for each title without going through the DVD menus. By selecting "Open Disk" you will obtain an expandable
Menu structure. Click on the plus (+) sign to expand each level and click on the title to view it. In selecting "Open Files" you can choose VIDEO_TS.IFO, which is the whole DVD Video content, or individual IFO files. The last feature is a real advantage over Recode which only imports the entire VIDEO_TS folder.
Unfortunately, most other software players will simply revert to the main menu or fail to open.
Remake a DVD
The "Remake a DVD" Option gives you the opportunity to seam together portions of a DVD which has been ripped to your hard drive or even from a DVD drive if Slysoft's ANYDVD is present on your system. These fragments can originate from different DVD's and you can combine two different DVD's to one.
The first step is to import the Titles that you wish by highlighting the Title (not the Movie) and click the Add Title Button. As long as there is an IFO file for the title, it should be able to be included on a new disc. You can hold down the control key to add additional titles.
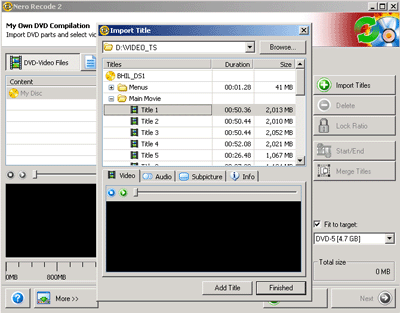
Figure 4
In this manner, you can add additional titles from different sources to create a new DVD. There is an unusual issue with this method in that
some titles are represented as larger file sizes in the "Import Title Menu" than they are represented in Windows Explorer. This is probably
related to the fact that some titles are copied with an entire VOB although the VOB includes information from other titles. The menus will not copy.
I tried to copy (Remake) a dual layer DVD without menus by including every title in the DVD. Whereas the entire DVD could be copied using
"Copy Entire DVD to DVD," the Remake option lacked sufficient disk space. The maximum compression for any title is about 50% which is adequate
for any dual layer DVD on the market as long as you stay in the "Copy Entire DVD to DVD" mode.
The Remake function is very useful for smaller titles. Just preview them from DVDShrink (using the IFO files in Windows Explorer) before adding them to a compilation. The VTS numbers do not correspond to the title numbers and titles can include portions of VOB's. Interestingly enough, some main movies
are nearly the same size as the actor or director interviews since the movies are recorded at lower bitrates than the interviews.
As soon as you have finished adding titles, the Start/End button appears.

Figure 5
The Start/End windows are taken directly from DVDShrink in the Reauthor Mode for editing the title by chapter or time. The small play
button allows you to step through the frames slowly and the fast forward buttons more quickly. Before committing anything to a new DVD,
it is a good idea to step through the title.
DVD structures can be very complex these days and titles may include portions of different VTS's. This is a particular problem with multiepisode
DVD's . Some of these are listed as having as much as six hours of content. In reality, the Special Features Include some favorite scenes which they
"borrow" from the full content (episodes). Before retaining the results of the edit, make certain there are no black areas indicating lost video content.
SPLITTING A LARGE MOVIE
The Remake program gives you a great opportunity to backup a three to four hour movie onto two blank DVD's without compression. If the main movie occupies more than 4.7 Gigabytes on the disk, it must be compressed even without Special Features. This is particularly applicable to some older, classic movies and documentaries. The method is simple:
First, choose the Remake mode. Next import the lengthy title, Add it and choose Finished. Examine the total number of Chapters using the drop down box.
From the start frame window, choose the first chapter and from the end frame, the middle chapter (about halfway through the movie). Now close the window
And burn the first disc. Now return to Remake mode and use the middle chapter as the Start Frame. The end frame should automatically be set to the of the movie.
There may be space for the Special Features and these belong on the second disc. These functions are similar to DVDXCOPY.
VERIFICATION
Nero Recode was installed on two PC's and a laptop using the method described above and performed flawlessly with several new DVD's . One of the PC's contained a Pioneer DVR-A03 burner for -R discs and there were no burning problems. DVD's Recoded with the laptop could be transferred over a home network to the PC ewhere the burner resides. There were some issues with scratched DVD's that could not be ripped to the hard drives. It is generally a good ideato backup your discs as soon as you purchase them to avoid this problem.
As might be expected with a new product, there are unsupported burners and recent changes have been made to ensure compatibility with the AMD 64 bit CPU and dual processor systems. The Nero forums also contain complaints about various aspects of the component programs that do not work properly.
In general, when these issues arise, it is best to uninstall other programs than relate to CD or DVD burning, reboot and reinstall the Nero Suite. Sometimes a complete reinstall of the operating system is needed to eliminate conflicts. As usual, wait for the updates and patches!
For an link to a site that has a an excellent guide for the portion of the program "Copy DVD to Nero Digital," see below:
http://www.polarhome.com:793/~afonic/recodedigital.htm
or perform a search for Afonic DVD Rip Guides
WHY PURCHASE RECODE?
A good question! DVDShrink is free and includes decryption without transferring the DVD Video files to the hard drive. DVDshrink does not however include a burning function and Nero is about as reliable as they get! DVD Shrink also does not allow the adjustment of Transcoding percentage for each title as does Nero (and DVDXCOPY Platinum). For some reason, DVDShrink 3.0 beta5 and earlier fails to compress certain DVD's after its initial analysis.
DVDShrink will reauthor a DVD but it will not preserve the menus. The non-main movie files are played in a certain order and can actually be edited to a limited extent.
At this point, there is no limit as to the number of PC's on which Nero can be installed with one serial number. This is unlike the situation with DVDXCOPY which requires Web or telephone activation. No other program has the "Remake a DVD" function except DVDShrink in reauthor mode.
Did the author of DVDShrink have a part in Nero Recode-almost certainly? There are so many similarities between these programs, including the fact that once you have processed a DVD, the advanced analysis option disappears for all future backups.
You also get the Nero Showtime player (similar to Real Player's DVD player) and all
the remaining Nero Programs. Showtime will also play MPEG4 files created with
Nero's own MPEG4 codec. Nero burning ROM
can still be used to burn DVD Video files in a folder on the hard drive. Just
highlight all of the DVD Video files and drag them into the VIDEO_TS folder
that has been created and burn.
CONCLUSION
Ahead Software has produced a tremendous suite with the latest Ultra Edition and Power Pack. It includes nearly everything that is necessary for
CD and DVD backups as well as provisions for audio and video recording and editing that have not been described in this article. It is well worth the price.
fin
.
