Page 2 of 3: How to use MenuShrink to save MB of space
This is a more detailed explanation of how MenuShrink works and what some of the buttons do.
-
 - The open button really serves two purposes.
 - The first one being that it improved the GUI of the program for Windows machines (GUI = Graphical User Interface, which basically means its more "User Friendly").
- The second being that it was implemented solely for "Linux" machines in the Wine environment.
-
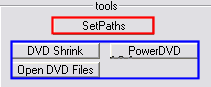 - MenuShrink lets you define 7 buttons which you can link to your favorite tools using the Path panel. The two first buttons are normally for DVD Shrink and your Software DVD. The Path panel will show the default Shrink path. If that is not where DVD Shrink is located, change the path. The main MenuShrink window also has a button named “Open DVD Files” to open the DVD folder in explorer (shortcut F). Setting the path to your favorite software DVD player will enable the second button on the main MenuShrink window (which by default is set to "PowerDVD" but, if you don't have PowerDVD installed on your computer, it won't do anything if you click it. So you need to change the path for that button). Note that for this to work, the player application has to be able to open a DVD from its command line (MenuShrink passes VIDEO_TS.IFO as an argument). Media player classic (free!) can do that and so can PowerDVD 6.0 but PowerDVD 5.0 can’t and neither can WinDVD 5.0.
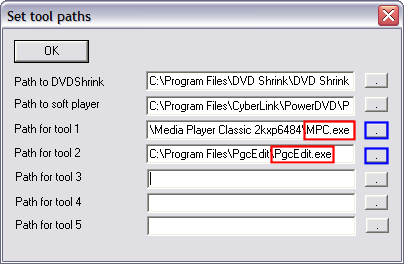
You can also set 5 additional tools which will open the VIDEO_TS.IFO file when you click on the corresponding button on the main window. I like to have PgcEdit, IfoEdit, and a second DVD player (just to check things work normally). These tools can also be launched via the F1-F5 keys.
To set up more buttons (programs) for MenuShrink to launch, click the "SetPaths" button and enter a new path in one of the blank boxes, blue boxes. (Note: the path needs to be the exact path of where the .exe file is located) I am going to add 2 buttons, one for my software DVD player, which is Media Player Classic and one for PgcEdit, which is my DVD editing program. (The name of the button displayed depends on what the .exe file is named. HINT HINT red box) (Screen Shot Below)
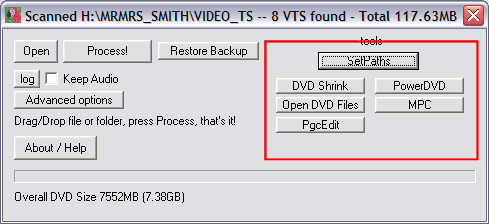
Now it should look like this after completing the previous step. (Screen Shot Below)
MenuShrink offers a few keyboard shortcuts listed below:- F1 through F5 to launch the tools defined in the Path panel.
- O to open the last DVD you processed.
- F to open the current DVD folder in explorer.
- E to open the INI file (with all your preferences) in the default text editor. This is for advanced users. Close MenuShrink before you save the INI file if you want your modifications to be saved (otherwise MenuShrink will overwrite the file).
- In the Preview Select panel, A to switch to Auto mode, and CTRL-K to kill playback, arrow keys to navigate.
- F1 through F5 to launch the tools defined in the Path panel.
 - This is where you can adjust which frames to select for the still menus, and make more advanced adjustments:
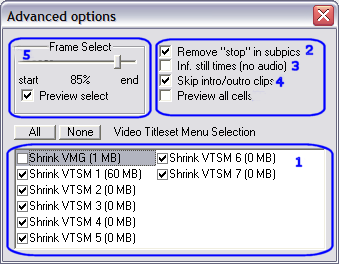
- All available menus (titlesets) are ticked by default. If you only wish to process certain menus, untick the ones you want MenuShrink to leave intact or click “None” and then select only the ones you’d like to process.
- You should leave the “Remove stop in subpics” option checked
- Decide whether you want the still menus to be displayed indefinitely (no-audio mode only). It’s best to leave this option unchecked in which case the menus will play for the same amount of time as they did originally
- You also have an option to skip menu intro/outro clips. These are the short video clips that are sometimes played before and after menus. Skipping them makes for a nicer smoother playback so you should select this option.
- You can use the Frame Select slider to decide where the still image should be taken from in the original menu. Move it all the way to the left to select the first image in the menu, all the way to the right to select the last image. The default position is 85%, which means the image is taken at 85% of the menu duration. Sometimes, the first or last images will be the clearest. Other times, the first image is black (fade-in) or the last one is (fade-out). Just experiment. If you don’t like your output, just try it again with different settings or switch to Preview-Select mode. You don’t even need to restore your backup as MenuShrink works on the files in its own special backup folder. If you use PowerDVD 6.0 or media player classic, this is where the “Soft DVD Player” button comes handy!
- If you prefer, you can select the still image by hand using the Preview. Check the “Preview Select” box to do that. When you click the Process button in the main window, a preview panel will pop up to let you chose the image for each menu cell. If you select Preview all cells, every cell that has more than 2 I-frames in it will open for you to preview it and select whether you want to kill it, shrink it or keep it animated.
